Monday, 13 July 2020

Tips for better landscape photography

I love landscape photography, especially when it is not sunny and bright outside, I believe weather conditions that we have here give us an endless opportunity to capture the beauty of the countryside/landscapes we have. Here are a few tips to improve your landscape photography.

Tip 1:
Photograph sunsets:
* metre for reflective foreground, such as the water; this will record the sunset and the foreground correctly
* use the ND (Neutral Density) filter

Reflections on the canal

Mountain reflection in the lake - Lake District

Tip 2:
Choose the right time of day:
* understand and see your light
* find a suitable viewpoint
* wait for right lighting conditions, light can make a huge difference in your final shot
* photograph in golden light
* photograph landscapes early morning

Photograph taken in Wales in the evening

Early morning, Loch Lamond, Scotland 

Golden light on bridge - Reading
Tip 3:
Weather conditions:
* capture atmospheric shots - take photographs in bad weather, capture rainy day shots, fog
* capture raindrops on tree branches, spider webs etc
* take a spot reading from a mid-tone from your scene

Early morning mist
Dew drop on the branch

Rain on grass reed

Snowy day, view from start of the Iron Bridge - Telford
 Tip 4:
Photograph seascape in all weather conditions:
* capture sky and reflections
* shoot dark stormy skies to create mood and atmosphere

Sunset behind the mountains

After the sunset over the beach - Lake District

Before the rain - Leicester
Tip 5:
Show scale in your photographs
* include in your photograph a human, tree, house to show scale
* use a long focal lens
* use a tripod for long exposures and in low light conditions

The tall tree - France

Walk in the park - Wakehurst Place

The red taxi - Bangkok 
Tip 6:
Exclude the sky:
* create dramatic, colourful images by excluding the sky
* concentrate on colour
* photograph reflections in the water, be creative
* photograph during the summer's hazy light to add character to your images
* exclude sky on dull days, shoot detail, patterns in the fields

Stormy day - Lands End, Cornwall

Carpet of Tulips - Keukenhof , Amsterdam 

Bubbles - Eden Project, Cornwall
Tip 7:
Photograph winter landscapes
* sun in the winter has a warm hue, giving it the 'golden light', which adds mood to the photograph
* photograph trees covered with snow, frost or rain drops
* shoot looking up at the trees
* shoot in wide angle and zoom in
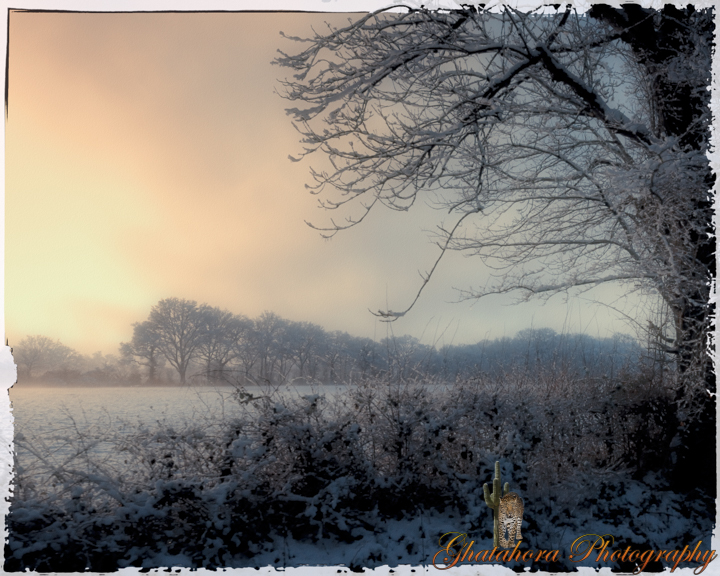

Snow - Near Bishopswood Golf Course, Baughurst

Tall trees - Pamber Forest

Snow in the trees - Tadley
Tip 8:
Leading lines:
* include paths, lines leading into the image, it creates perspective and adds sense of distance & depth
* use a wide angle lens

Micheldever Woods, Basingstoke
Dinas Head - Cornwall
Tip 9:
Include foreground interest:
* use wide angle lens
* include foreground interest to create a sense of distance
* shoot from low angle to emphasize the sky
* photo white clouds and dramatic stormy clouds

Seaside - Northumberland 


Textures - Northumberland
Tip 10:
Use slow or fast shutter speed:
* capture movement in water or to freeze the waves
* on bright sunny days use filters to have a slow shutter speed
* cloudy/shade is perfect lighting conditions to photograph movement in water


Waves - Cornwall

Bradgate Park - Charnwood Forest, Leicestershire

Bhupinder Ghatahora ABIPP, ARPS, ASWPP
Ghatahora Photography
info@ghatahora.co.uk
www.ghatahora.co.uk
Twitter
Pinterest
Instagram
Flickr
Facebook


Sunday, 5 July 2020

Light Painting with Mobile Phone

Mobile phones today have amazing in-built features that one can use to photograph creatively. I have a Huawei P30 Lite which has a triple camera with 48MP. I am really amazed with the quality of the photographs the phone produces.

I have never tried light painting with my Professional Digital camera before, however, I was ready to set my self a challenge to create light painting photographs with my Huawei Peacock Blue mobile phone. The mobile phone has standard features such as; AR Lens, Night, Portrait, Photo, Video and More. See the images below, please note that these images are screen shots of my phone.


Under the 'More' function, the phone has 11 extra settings (see image below of the functions on the mobile phone Please note that these images are screen shots of my phone).


I chose the 'Light Painting' function, which is further divided into 4 more functions, (see image below, these images are screen shots of my phone).


All of the below photographs are taken using the 'Light Painting' mode on the mobile phone.

For the shot below, I set mobile phone on 'Light Graffiti', the phone was mounted on a selfie stick which also can be converted into a mini tripod. The shot below was taken on my kitchen counter, no backdrop was used. The lights were switched off in the kitchen, prior to that the shot was focused and locked in on the face.

I used a battery operated candle to create light the image. The mobile phone on light painting mode has a ''live view' which means I could see the image being created and knew when to stop the exposure on my shot. I used the candle to light the front of the image, starting with the face, shoulders, then moving the candle around to light the whole image. While doing this, I had to keep a very close eye on the camera as it was creating the image and making sure that the light does not create any unwanted shapes or glares. The total exposure for this image was around 5 minutes.


For the shot below, the same technique as above was used. This image was lit from the back of the bottle, again keeping in mind to add no unwanted glares added to the image. I also added light to the front of the perfume bottle using a small LED torch. The torch was covered with a piece of white tissue to diffuse the light. The exposure for this shot was just over 4 minutes. I quite like the way the use of the torch has added a blue effect on the lid of the bottle. This is because the candle has a warm temperature at 1500 Kelvin and a LED torch on average is 4000/6000 Kelvin, a cooler light temperature.


This image is of a jelly candle and was lit using a battery operated candle from behind, moving the candle up and down slowly. Again, I kept an eye on the view finder to see that the image was not over exposed or casing any glares. The total exposure for this image was roughly 4 minutes.


This is an image of a house plant shot in 'Light Graffiti' mode, lit with a battery operated candle. Each part of the plant was lit in sections.
 

This image of the perfume bottle was shot using the 'Light Graffiti' mode and was lit using the LED torch and battery operated candle. The swirls were created using the candle.


The next two photographs were also taken using the mobile phone on 'Light Graffiti' mode. Both images below are of fairy lights. The phone was hand held and moved in various directions to create interesting patterns. I must have taken several photographs as I got carried away taking photographs around the house in the middle of the night. Again, keep an eye on the view finder as the image can easily be overexposed. The exposure time range from 10 seconds to a minute.


This image was taken in the garden of the stars. The phone was mounted on the mini tripod and pointed up towards the sky. The phone was set on 'Star Trails' mode. The phone was left in the garden for 45 minutes on the mini tripod. I took this shot in May around 9.15 pm. If you are taking photographs of the stars, it is best to set up when there is still some colour in the sky and on a clear night.


The last two photographs were taken through my bedroom window. It was dark outside - the light from the moon and the windows created an atmospheric scene. This was photographed on 'Night' mode on the phone.


This image is of the same scene, I just moved my phone up and down to capture the light in an abstract form.


I was truly amazed with the images the phone was capturing. When I started this project, I was not sure if it was going to be successful. It was a challenge that I am willing to explore again at another level.

Bhupinder Ghatahora ABIPP, ARPS, ASWPP
Ghatahora Photography
info@ghatahora.co.uk
Facebook

Friday, 26 June 2020

Selective Focus

In photography terms, 'Selective Focus' means that the photographer chooses which part of the image he/she would want to keep in focus. This could mean that the photographer chooses to keep the foreground in focus, blurring the background. Or keeping the mid ground / background in focus and blurring the rest of the image.

Using selective focus adds mood, drama and dimension to the final image.

It is very easy to create images with selective focus, this effect can be achieved with the use of macro lens, telephoto lenses or changing your depth of field, using a wide aperture anything from f1.4 to f5.6.

Here are a few examples of selective focus images.

Photograph of a wild flower taken in the garden, using a macro lens and fill-in flash

Wild Flower

Photograph of the bird, blurring the background
Lilac breasted roller bird

Photograph of a flower, taken using a macro lens, the point of focus was the centre of the flower
Orange Flower


Photograph of grass reed, taken early in the morning, the point of focus was the flowerhead, blurring the reed
Reed

The photograph below was taken on my mobile phone, by standing very close to the water droplet, the camera lens focused on the droplet and blurring the background. Most mobile phones have 'aperture' mode (which can be found under 'more' in your camera settings), using this setting, it allows you to choose your desired aperture.

Drop of water

The photograph below was also taken using my mobile phone, I selected the 'Aperture' mode on my phone and chose the widest aperture (f4) and focused on the bee.


Bee

The photograph below was taken using a standard lens, the point of focus was the single stem of bluebells

Blue Bells

Selective focus can be used in anywhere your photography; landscapes, street photography, portraits, it really depends what you as a photographer want to show through your photographs, by creating mood and drama to the images.


Bhupinder Ghatahora ABIPP, ARPS, ASWPP
Ghatahora Photography
info@ghatahora.co.uk
Facebook

Friday, 29 May 2020

Water Droplets

It is always interesting to take photographs after it has rained, there is a lot of photographic opportunities.

This photograph of water bubbles was taken looking down into the fish tank. The image as been cropped to add emphasis on the larger bubble. This photograph was taken using available light on my mobile phone.


The water droplets are created using sodium bicarbonate ear drops on the surface of a CD. I found that the ear drops were a lot easier to use for creating the droplets, as they created a rounder, 3D water bubble. I tried using water on a glass chopping board, with my tablet placed at the bottom to light it up. This set-up was very awkward, as the water droplets did not have the defined shape and roundness that I was trying to achieve, therefore making it harder to focus. This is the image that I attempted.


This image was photographed at the beginning of the month, and these water/oil droplets have stayed in tact as we speak. This shot was lit with a table lamp placed above the droplets and a blue fibre optic light to add the sparkle in the bubbles.
This photograph was taken using a Nikon macro lens attached to the Sony a600.


The photograph of the tulip was taken using my mobile phone early in the morning after the rain had stopped. The final image was edited in Snapseed, which is a mobile editing software. I increased the contrast of the final image.


The photographs below have been taken using the Sony a6000 early in the morning with available light. All these images have been slighting cropped to tidy around the edges.


The image below was taken with my mobile phone on the same day as the tulip. The colours of the final image have been increased. I used a shallow depth of field and focused on the dew drop.


The image of dew drops on the washing line (below) was also taken with my mobile phone. I set the mobile phone on 'Pro' setting, under exposed the shot by 1 stop and changed the aperture to f11 to get all the dew drops in focus. I was very close to the dew drops, this blurred the background. The dew drops were hanging from the bottom of the washing line, I rotated the final image to have the dew drops sitting on the washing line.


The photograph below is of water droplets pouring out from a bursting balloon, just before the water from the balloon landed on the ground. I have heavily cropped this image to focus on the dancing water droplets.


The photograph below was taken with my mobile phone, focusing on the dew drop, I switched on the built in light bulb on the camera to add light onto the dew drop. I did not use flash as it over powered the final image. This image was not edited.


Bhupinder Ghatahora ABIPP, ARPS, ASWPP
Ghatahora Photography
info@ghatahora.co.uk
Facebook