Showing posts with label before and after. Show all posts

Wednesday, 11 December 2019

Before and After

The below photograph is straight from the camera with no adjustments.


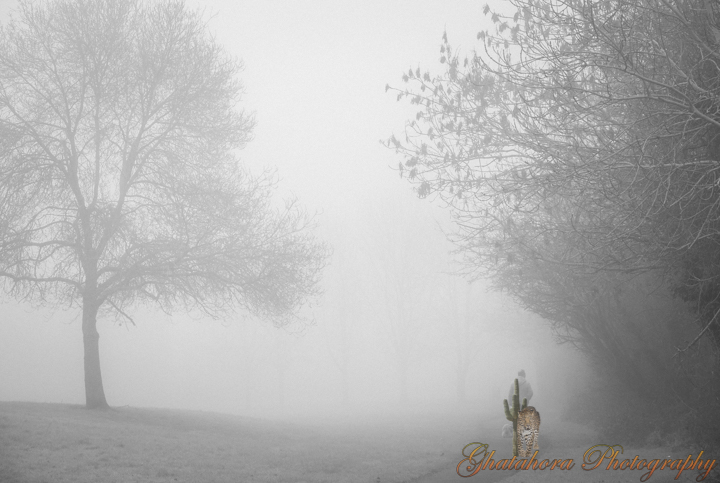
The photograph below has been adjusted in lightroom, with global and local adjustments to the final image.


These are the global adjustments that were applied to the whole of the image.

White balance: As shot
Exposure: +48
Contrast: +10
Highlights: -38
Shadows: 0
Whites: +17
Blacks: -2
Clarity: +10
Vibrance: +10
Saturation: +2

A few local adjustments were made to brighten the people, foreground and background. These adjustments are to be used as guide, each image will be different. 

Bhupinder Ghatahora ABIPP, ARPS, ASWPP
Ghatahora Photography
info@ghatahora.co.uk
Facebook

Wednesday, 13 November 2019

Before and After

The photograph is straight from the camera with no adjustments.


This photograph has been adjusted in lightroom, with just global adjustments.


These are the global adjustments that were applied to the whole of the image.

White balance: Daylight - 5500
Exposure: 0
Contrast: +14
Highlights: -71
Shadows: +14
Whites: -29
Blacks: +7
Clarity: +12
Vibrance: +19
Saturation: +7

A few local adjustments were made to brighten the people, foreground and background. These adjustments are to be used as guide, each image will be different. 


Bhupinder Ghatahora
Ghatahora Photography
info@ghatahora.co.uk
Facebook

Wednesday, 9 October 2019

Before and After

The below image is straight from the camera, no adjustments.


The image below has had global adjustments made to it.


These are the global adjustments that were applied to the whole of the image.

White balance: 3771
Tint: -28
Exposure: 0
Contrast: 0
Highlights: -100
Shadows: +14
Whites: +12
Blacks: -10
Clarity: 0
Vibrance: 0
Saturation: 0

A few local adjustments were made to brighten the people, foreground and background. These adjustments are to be used as guide, each image will be different. 


Bhupinder Ghatahora
Ghatahora Photography
info@ghatahora.co.uk
Facebook

Wednesday, 11 September 2019

Before and After

The image below is straight from the camera, no adjustments.


The image below has been adjusted in lightroom.


These are the global adjustments that were applied to the whole of the image.

White balance: As shot
Exposure: -0.71
Contrast: +10
Highlights: -100
Shadows: +24
Whites: 0
Blacks: -19
Clarity: +14
Vibrance: +38
Saturation: +0

A few local adjustments were made to brighten the foreground and background. These adjustments are to be used as guide, each image will be different. 


Bhupinder Ghatahora
Ghatahora Photography
info@ghatahora.co.uk
Facebook

Wednesday, 14 August 2019

Before and After

The image below is straight from the camera


This image below has been adjusted in lightroom, with just the saturation turned to -100.


These are the global adjustments that were applied to the whole of the image.

White balance: As shot
Exposure: 0
Contrast: 0
Highlights: 0
Shadows: 0
Whites: 0
Blacks: 0
Clarity: 0
Vibrance: 0
Saturation: -100

A few local adjustments were made to brighten the people, foreground and background. These adjustments are to be used as guide, each image will be different. 


Bhupinder Ghatahora
Ghatahora Photography
info@ghatahora.co.uk
Facebook

Wednesday, 10 July 2019

Before and After

Original image straight from the camera


Image below converted into black & white and it has also been cropped to from the bottom to close in on the trees.


Bhupinder Ghatahora
Ghatahora Photography
info@ghatahora.co.uk
Facebook

Wednesday, 12 June 2019

Before and After

The photograph is straight from the camera.


The photograph below has had slight adjustments, colour has been enhanced and the final image has been cropped to remove the swan heads and the fence from the bottom of the image.


Bhupinder Ghatahora
Ghatahora Photography
info@ghatahora.co.uk
Facebook

Wednesday, 15 May 2019

Before and After

The below image is straight from the camera.


Some global and local adjustments have been made to the overall image to enhance the colour, tone, contrast of the image. I added a slight blue tone to create a cold feeling in the image. The trees in the foreground have been lightened slightly to bring out the shape and colour of the trees.


These are the global adjustments that were applied to the whole of the image.

White balance: As shot
Exposure: 0
Contrast: -5
Highlights: -69
Shadows: +33
Whites: +71
Blacks: -9
Clarity: 0
Vibrance: 0
Saturation: -10

A few local adjustments were made to brighten the people, foreground and background. These adjustments are to be used as guide, each image will be different. 


Bhupinder Ghatahora
Ghatahora Photography
info@ghatahora.co.uk
Facebook

Wednesday, 10 April 2019

Before and After

The below photograph is straight from the camera, it has been under exposed by half a stop to detail in the clouds.


This photograph below has been edited to enhance the sky and the a few local adjustments have been made to add colour, contrast and tone to this image.


These are the global adjustments that were applied to the whole of the image.

White balance: As shot
Exposure: -48
Contrast: +10
Highlights: -45
Shadows: +21
Whites: +14
Blacks: -26
Clarity: +19
Vibrance: +12
Saturation: 0

A few local adjustments were made to brighten the people, foreground and background. These adjustments are to be used as guide, each image will be different. 


Bhupinder Ghatahora
Ghatahora Photography
info@ghatahora.co.uk
Facebook